FTP ETW Tracing and IIS 8 - Part 2
09 April 2014 • by Bob • Batch Files, ETW, IIS 8, Log Files, LogParser, Scripting, Troubleshooting, FTP, IIS, IIS 8, LogParser, FTP
Shortly after I published my FTP ETW Tracing and IIS 8 blog post, I was using the batch file from that blog to troubleshoot an issue that I was having with a custom FTP provider. One of the columns which I display in my results is Clock-Time, which is obviously a sequential timestamp that is used to indicate the time and order in which the events occurred.
| (Click the following image to view it full-size.) |
 |
At first glance the Clock-Time values might appear to be a range of useless numbers, but I use Clock-Time values quite often when I import the data from my ETW traces into something like Excel and I need to sort the data by the various columns.
That being said, apart from keeping the trace events in order, Clock-Time isn't a very user-friendly value. However, LogParser has some great built-in functions for crunching date/time values, so I decided to update the script to take advantage of some LogParser coolness and reformat the Clock-Time value into a human-readable Date/Time value.
My first order of business was to figure out how to decode the Clock-Time value; since Clock-Time increases for each event, it is obviously an offset from some constant, and after a bit of searching I found that the Clock-Time value is the offset in 100-nanosecond intervals since midnight on January 1, 1601. (Windows uses that value in a lot of places, not just ETW.) Once I had that information, it was pretty easy to come up with a LogParser formula to convert the Clock-Time value into the local time for my system, which is much easier to read.
With that in mind, here is the modified batch file:
@echo off

rem ======================================================================

rem Clean up old log files
for %%a in (ETL CSV) do if exist "%~n0.%%a" del "%~n0.%%a"

echo Starting the ETW session for full FTP tracing...
LogMan.exe start "%~n0" -p "IIS: Ftp Server" 255 5 -ets
echo.
echo Now reproduce your problem.
echo.
echo After you have reproduced your issue, hit any key to close the FTP
echo tracing session. Your trace events will be displayed automatically.
echo.
pause>nul

rem ======================================================================

echo.
echo Closing the ETW session for full FTP tracing...
LogMan.exe stop "%~n0" -ets

rem ======================================================================

echo.
echo Parsing the results - this may take a long time depending on the size of the trace...
if exist "%~n0.etl" (
   TraceRpt.exe "%~n0.etl" -o "%~n0.csv" -of CSV
   LogParser.exe "SELECT [Clock-Time], TO_LOCALTIME(ADD(TO_TIMESTAMP('1601-01-01 00:00:00', 'yyyy-MM-dd hh:mm:ss'), TO_TIMESTAMP(DIV([Clock-Time],10000000)))) AS [Date/Time], [Event Name], Type, [User Data] FROM '%~n0.csv'" -i:csv -e 2 -o:DATAGRID -rtp 20
)
When you run this new batch file, it will display an additional "Date/Time" column with a more-informative value in local time for the sever where you captured the trace.
| (Click the following image to view it full-size.) |
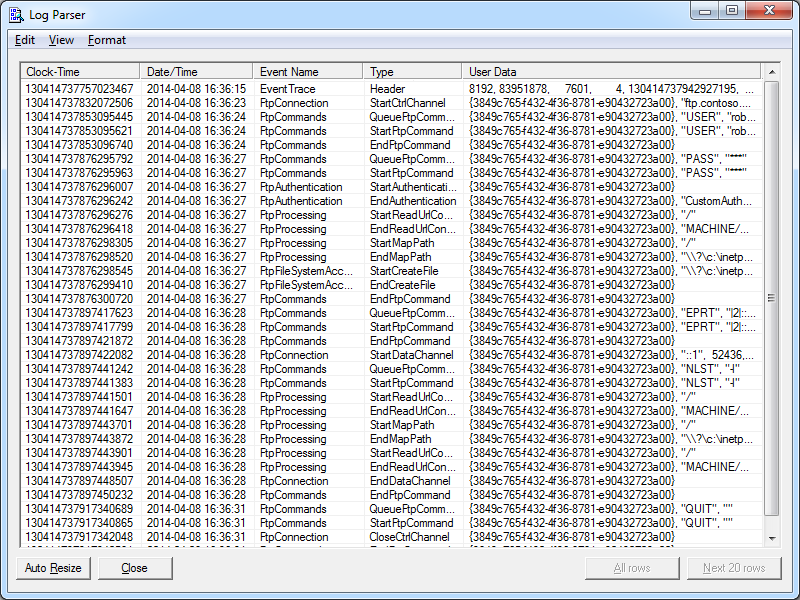 |
The new Date/Time column is considerably more practical, so I'll probably keep it in the batch file that I use when I am troubleshooting. You will also notice that I kept the original Clock-Time column; I chose to do so because I will undoubtedly continue to use that column for sorting when I import the data into something else, but you can safely remove that column if you would prefer to use only the new Date/Time value.
That wraps it up for today's post. :-)
Note: This blog was originally posted at http://blogs.msdn.com/robert_mcmurray/
FTP ETW Tracing and IIS 8
08 April 2014 • by Bob • FTP, IIS, IIS 8, LogParser, IIS, IIS 8, LogParser, ETW, Troubleshooting, Scripting, Batch Files, Log Files
In the past I have written a couple of blogs about using the FTP service's Event Tracing for Windows (ETW) features to troubleshoot issues; see FTP and ETW Tracing and Troubleshooting Custom FTP Providers with ETW for details. Those blog posts contain batch files which use the built-in Windows LogMan utility to capture an ETW trace, and they use downloadable LogParser utility to parse the results into human-readable form. I use the batch files from those blogs quite often, and I tend to use them a lot when I am developing custom FTP providers which add new functionality to my FTP servers.
Unfortunately, sometime around the release of Windows 8 and Windows Server 2012 I discovered that the ETW format had changed, and the current version of LogParser (version 2.2) cannot read the new ETW files. When you try to use the batch files from my blog with IIS 8, you see the following errors:
Verifying that LogParser.exe is in the path...
Done.

Starting the ETW session for full FTP tracing...
The command completed successfully.

Now reproduce your problem.

After you have reproduced your issue, hit any key to close the FTP tracing session. Your trace events will be displayed automatically.

Closing the ETW session for full FTP tracing...
The command completed successfully.

Parsing the results - this may take a long time depending on the size of the trace...
Task aborted.
Cannot open <from-entity>: Trace file "C:\temp\ftp.etl" has been created on a OS version (6.3) that is not compatible with the current OS version

Statistics:
-----------
Elements processed: 0
Elements output: 0
Execution time: 0.06 seconds
I meant to research a workaround at the time, but one thing led to another and I simply forgot about doing so. But I needed to use ETW the other day when I was developing something, so that seemed like a good time to quit slacking and come up with an answer. :-)
With that in mind, I came up with a very easy workaround, which I will present here. Once again, this batch file has a requirement on LogParser being installed on your system, but for the sake of brevity I have removed the lines from this version of the batch file which check for LogParser. (You can copy those lines from my previous blog posts if you want that functionality restored.)
Here's the way that this workaround is implemented: instead of creating an ETW log and then parsing it directly with LogParser, this new batch file invokes the built-in Windows TraceRpt command to parse the ETW file and save the results as a CSV file, which is then read by LogParser to view the results in a datagrid like the batch files in my previous blogs:
@echo off

rem ======================================================================

rem Clean up old log files
for %%a in (ETL CSV) do if exist "%~n0.%%a" del "%~n0.%%a"

echo Starting the ETW session for full FTP tracing...
LogMan.exe start "%~n0" -p "IIS: Ftp Server" 255 5 -ets
echo.
echo Now reproduce your problem.
echo.
echo After you have reproduced your issue, hit any key to close the FTP
echo tracing session. Your trace events will be displayed automatically.
echo.
pause>nul

rem ======================================================================

echo.
echo Closing the ETW session for full FTP tracing...
LogMan.exe stop "%~n0" -ets

rem ======================================================================

echo.
echo Parsing the results - this may take a long time depending on the size of the trace...
if exist "%~n0.etl" (
    TraceRpt.exe "%~n0.etl" -o "%~n0.csv" -of CSV
    LogParser.exe "SELECT [Clock-Time], [Event Name], Type, [User Data] FROM '%~n0.csv'" -i:csv -e 2 -o:DATAGRID -rtp 20
)
Here's another great thing about this new batch file - it will also work down-level on Windows 7 and Windows Server 2008; so if you have been using my previous batch files with IIS 7 - you can simply replace your old batch file with this new version. You will see a few differences between the results from my old batch files and this new version, namely that I included a couple of extra columns that I like to use for troubleshooting.
| (Click the following image to view it full-size.) |
| |
There is one last thing which I would like to mention in closing: I realize that it would be much easier on everyone if Microsoft simply released a new version of LogParser which works with the new ETW format, but unfortunately there are no plans at the moment to release a new version of LogParser. And trust me - I'm just as depressed about that fact as anyone else. :-(
Note: This blog was originally posted at http://blogs.msdn.com/robert_mcmurray/
What's New in IIS 8.5?
11 July 2013 • by Bob • IIS, IIS 8.5, Windows Server 2012 R2
Microsoft released the Windows 8.1 Preview on June 26, but some of the articles that the IIS team was working on for IIS 8.5 needed a little more work before we published them. That being said, those articles were published on IIS.net earlier today, and here is a quick preview of those articles and the new features in IIS 8.5 which they describe:
- Dynamic Website Activation in IIS 8.5
This feature allows IIS to scale to an even larger set of websites than before by only loading websites after an HTTP request has been received; this significantly reduces the startup time and initial resource allocation for IIS, and it prevents resources from being unnecessarily consumed for websites that are accessed infrequently. - Enhanced Logging for IIS 8.5
IIS now provides built-in functionality for adding custom logging fields to your W3C log files that are populated with values that are from request headers, response headers, or server variables. This functionality allows you to log a great deal of custom information about each HTTP request; for example, you could include the information an HTTP header like X-Forwarded-For, which would allow you to decode the request path through all firewalls/proxies, or you could insert information from a custom module into a server variable and have IIS add that information directly to your logs. - Idle Worker Process Page-Out in IIS 8.5
In previous versions of IIS, inactive worker processes were terminated when they reached their recycle interval, but IIS 8.5 allows you to configure your application pools so that inactive worker processes are swapped out to the page file; since IIS can restore a suspended worker process into service much faster than starting up a new worker process, this functionality significantly improves the user experience when a request is received for a suspended application. - Logging to Event Tracing for Windows in IIS 8.5
IIS 8.5 expands the logging capabilities for HTTP events to include Event Tracing for Windows (ETW); this functionality allows you monitor your IIS events in real-time, which can be extremely useful for troubleshooting and debugging/developing applications.
For examples of these technologies in action, you can watch one of the following presentations:
- Internet Information Services: What’s New in Window Server 2012 R2 (from TechEd USA)
- Internet Information Services: What’s New in Window Server 2012 R2 (from TechEd Europe)
Special thanks go to Gary Ericson for putting together and publishing these articles on IIS.net, and a big round of thanks to the IIS team for adding all of these new features!
(One quick note in closing: functionality similar to IIS 8.5's Enhanced Logging was available in the past by installing separate modules, but IIS 8.5 now makes this functionality available out-of-the-box.)
Note: This blog was originally posted at http://blogs.msdn.com/robert_mcmurray/
Advanced Log Parser Part 7 - Creating a Generic Input Format Plug-In
28 February 2013 • by Bob • LogParser, Scripting, XML
In Part 6 of this series, I showed how to create a very basic COM-based input format provider for Log Parser. I wrote that blog post as a follow-up to an earlier blog post where I had written a more complex COM-based input format provider for Log Parser that worked with FTP RSCA events. My original blog post had resulted in several requests for me to write some easier examples about how to get started writing COM-based input format providers for Log Parser, and those appeals led me to write my last blog post:
Advanced Log Parser Part 6 - Creating a Simple Custom Input Format Plug-In
The example in that blog post simply returns static data, which was the easiest example that I could demonstrate.
For this follow-up blog post, I will illustrate how to create a simple COM-based input format plug-in for Log Parser that you can use as a generic provider for consuming data in text-based log files. Please bear in mind that this is just an example to help developers get started writing their own COM-based input format providers; you might be able to accomplish some of what I will demonstrate in this blog post by using the built-in Log Parser functionality. That being said, this still seems like the best example to help developers get started because consuming data in text-based log files was the most-often-requested example that I received.
In Review: Creating COM-based plug-ins for Log Parser
In my earlier blog posts, I mentioned that a COM plug-in has to support several public methods. You can look at those blog posts when you get the chance, but it is a worthwhile endeavor for me to copy the following information from those blog posts since it is essential to understanding how the code sample in this blog post is supposed to work.
| Method Name | Description |
|---|---|
| OpenInput | Opens your data source and sets up any initial environment settings. |
| GetFieldCount | Returns the number of fields that your plug-in will provide. |
| GetFieldName | Returns the name of a specified field. |
| GetFieldType | Returns the datatype of a specified field. |
| GetValue | Returns the value of a specified field. |
| ReadRecord | Reads the next record from your data source. |
| CloseInput | Closes your data source and cleans up any environment settings. |
Once you have created and registered a COM-based input format plug-in, you call it from Log Parser by using something like the following syntax:
logparser.exe "SELECT * FROM FOO" -i:COM -iProgID:BAR
In the preceding example, FOO is a data source that makes sense to your plug-in, and BAR is the COM class name for your plug-in.
Creating a Generic COM plug-in for Log Parser
As I have done in my previous two blog posts about creating COM-based input format plug-ins, I'm going to demonstrate how to create a COM component by using a scriptlet since no compilation is required. This generic plug-in will parse any text-based log files where records are delimited by CRLF sequences and fields/columns are delimited by a separator that is defined as a constant in the code sample.
To create the sample COM plug-in, copy the following code into a text file, and save that file as "Generic.LogParser.Scriptlet.sct" to your computer. (Note: The *.SCT file extension tells Windows that this is a scriptlet file.)
<SCRIPTLET>
  <registration
    Description="Simple Log Parser Scriptlet"
    Progid="Generic.LogParser.Scriptlet"
    Classid="{4e616d65-6f6e-6d65-6973-526f62657274}"
    Version="1.00"
    Remotable="False" />
  <comment>
  EXAMPLE: logparser "SELECT * FROM 'C:\foo\bar.log'" -i:COM -iProgID:Generic.LogParser.Scriptlet
  </comment>
  <implements id="Automation" type="Automation">
    <method name="OpenInput">
      <parameter name="strFileName"/>
    </method>
    <method name="GetFieldCount" />
    <method name="GetFieldName">
      <parameter name="intFieldIndex"/>
    </method>
    <method name="GetFieldType">
      <parameter name="intFieldIndex"/>
    </method>
    <method name="ReadRecord" />
    <method name="GetValue">
      <parameter name="intFieldIndex"/>
    </method>
    <method name="CloseInput">
      <parameter name="blnAbort"/>
    </method>
  </implements>
  <SCRIPT LANGUAGE="VBScript">

Option Explicit

' Define the column separator in the log file.
Const strSeparator = "|"

' Define whether the first row contains column names.
Const blnHeaderRow = True

' Define the field type constants.
Const TYPE_INTEGER   = 1
Const TYPE_REAL      = 2
Const TYPE_STRING    = 3
Const TYPE_TIMESTAMP = 4
Const TYPE_NULL      = 5

' Declare variables.
Dim objFSO, objFile, blnFileOpen
Dim arrFieldNames, arrFieldTypes
Dim arrCurrentRecord

' Indicate that no file has been opened.
blnFileOpen = False

' --------------------------------------------------------------------------------
' Open the input session.
' --------------------------------------------------------------------------------

Public Function OpenInput(strFileName)
    Dim tmpCount
    ' Test for a file name.
    If Len(strFileName)=0 Then
        ' Return a status that the parameter is incorrect.
        OpenInput = 87
        blnFileOpen = False
    Else
        ' Test for single-quotes.
        If Left(strFileName,1)="'" And Right(strFileName,1)="'" Then
            ' Strip the single-quotes from the file name.
            strFileName = Mid(strFileName,2,Len(strFileName)-2)
        End If
        ' Open the file system object.
        Set objFSO = CreateObject("Scripting.Filesystemobject")
        ' Verify that the specified file exists.
        If objFSO.FileExists(strFileName) Then
            ' Open the specified file.
            Set objFile = objFSO.OpenTextFile(strFileName,1,False)
            ' Set a flag to indicate that the specified file is open.
            blnFileOpen = true
            ' Retrieve an initial record.
            Call ReadRecord()
            ' Redimension the array of field names.
            ReDim arrFieldNames(UBound(arrCurrentRecord))
            ' Loop through the record fields.
            For tmpCount = 0 To (UBound(arrFieldNames))
                ' Test for a header row.
                If blnHeaderRow = True Then
                    arrFieldNames(tmpCount) = arrCurrentRecord(tmpCount)
                Else
                    arrFieldNames(tmpCount) = "Field" & (tmpCount+1)
                End If
            Next
            ' Test for a header row.
            If blnHeaderRow = True Then
                ' Retrieve a second record.
                Call ReadRecord()
            End If
            ' Redimension the array of field types.
            ReDim arrFieldTypes(UBound(arrCurrentRecord))
            ' Loop through the record fields.
            For tmpCount = 0 To (UBound(arrFieldTypes))
                ' Test if the current field contains a date.
                If IsDate(arrCurrentRecord(tmpCount)) Then
                    ' Specify the field type as a timestamp.
                    arrFieldTypes(tmpCount) = TYPE_TIMESTAMP
                ' Test if the current field contains a number.
                ElseIf IsNumeric(arrCurrentRecord(tmpCount)) Then
                    ' Test if the current field contains a decimal.
                    If InStr(arrCurrentRecord(tmpCount),".") Then
                        ' Specify the field type as a real number.
                        arrFieldTypes(tmpCount) = TYPE_REAL
                    Else
                        ' Specify the field type as an integer.
                        arrFieldTypes(tmpCount) = TYPE_INTEGER
                    End If
                ' Test if the current field is null.
                ElseIf IsNull(arrCurrentRecord(tmpCount)) Then
                    ' Specify the field type as NULL.
                    arrFieldTypes(tmpCount) = TYPE_NULL
                ' Test if the current field is empty.
                ElseIf IsEmpty(arrCurrentRecord(tmpCount)) Then
                    ' Specify the field type as NULL.
                    arrFieldTypes(tmpCount) = TYPE_NULL
                ' Otherwise, assume it's a string.
                Else
                    ' Specify the field type as a string.
                    arrFieldTypes(tmpCount) = TYPE_STRING
                End If
            Next
            ' Temporarily close the log file.
            objFile.Close
            ' Re-open the specified file.
            Set objFile = objFSO.OpenTextFile(strFileName,1,False)
            ' Test for a header row.
            If blnHeaderRow = True Then
                ' Skip the first row.
                objFile.SkipLine
            End If
            ' Return success status.
            OpenInput = 0
        Else
            ' Return a file not found status.
            OpenInput = 2
        End If
    End If
End Function

' --------------------------------------------------------------------------------
' Close the input session.
' --------------------------------------------------------------------------------

Public Function CloseInput(blnAbort)
    ' Free the objects.
    Set objFile = Nothing
    Set objFSO = Nothing
    ' Set a flag to indicate that the specified file is closed.
    blnFileOpen = False
End Function

' --------------------------------------------------------------------------------
' Return the count of fields.
' --------------------------------------------------------------------------------

Public Function GetFieldCount()
    ' Specify the default value.
    GetFieldCount = 0
    ' Test if a file is open.
    If (blnFileOpen = True) Then
        ' Test for the number of field names.
        If UBound(arrFieldNames) > 0 Then
            ' Return the count of fields.
            GetFieldCount = UBound(arrFieldNames) + 1
        End If
    End If
End Function

' --------------------------------------------------------------------------------
' Return the specified field's name.
' --------------------------------------------------------------------------------

Public Function GetFieldName(intFieldIndex)
    ' Specify the default value.
    GetFieldName = Null
    ' Test if a file is open.
    If (blnFileOpen = True) Then
        ' Test if the index is valid.
        If intFieldIndex<=UBound(arrFieldNames) Then
            ' Return the specified field name.
            GetFieldName = arrFieldNames(intFieldIndex)
        End If
    End If
End Function

' --------------------------------------------------------------------------------
' Return the specified field's type.
' --------------------------------------------------------------------------------

Public Function GetFieldType(intFieldIndex)
    ' Specify the default value.
    GetFieldType = Null
    ' Test if a file is open.
    If (blnFileOpen = True) Then
        ' Test if the index is valid.
        If intFieldIndex<=UBound(arrFieldTypes) Then
            ' Return the specified field type.
            GetFieldType = arrFieldTypes(intFieldIndex)
        End If
    End If
End Function

' --------------------------------------------------------------------------------
' Return the specified field's value.
' --------------------------------------------------------------------------------

Public Function GetValue(intFieldIndex)
    ' Specify the default value.
    GetValue = Null
    ' Test if a file is open.
    If (blnFileOpen = True) Then
        ' Test if the index is valid.
        If intFieldIndex<=UBound(arrCurrentRecord) Then
            ' Return the specified field value based on the field type.
            Select Case arrFieldTypes(intFieldIndex)
                Case TYPE_INTEGER:
                    GetValue = CInt(arrCurrentRecord(intFieldIndex))
                Case TYPE_REAL:
                    GetValue = CDbl(arrCurrentRecord(intFieldIndex))
                Case TYPE_STRING:
                    GetValue = CStr(arrCurrentRecord(intFieldIndex))
                Case TYPE_TIMESTAMP:
                    GetValue = CDate(arrCurrentRecord(intFieldIndex))
                Case Else
                    GetValue = Null
            End Select
        End If
    End If
End Function

' --------------------------------------------------------------------------------
' Read the next record, and return true or false if there is more data.
' --------------------------------------------------------------------------------

Public Function ReadRecord()
    ' Specify the default value.
    ReadRecord = False
    ' Test if a file is open.
    If (blnFileOpen = True) Then
        ' Test if there is more data.
        If objFile.AtEndOfStream Then
            ' Flag the log file as having no more data.
            ReadRecord = False
        Else
            ' Read the current record.
            arrCurrentRecord = Split(objFile.ReadLine,strSeparator)
            ' Flag the log file as having more data to process.
            ReadRecord = True
        End If
    End If
End Function

  </SCRIPT>

</SCRIPTLET>
After you have saved the scriptlet code to your computer, you register it by using the following syntax:
regsvr32 Generic.LogParser.Scriptlet.sct
At the very minimum, you can now use the COM plug-in with Log Parser by using syntax like the following:
logparser "SELECT * FROM 'C:\Foo\Bar.log'" -i:COM -iProgID:Generic.LogParser.Scriptlet
Next, let's analyze what this sample does.
Examining the Generic Scriptlet in Detail
Here are the different parts of the scriptlet and what they do:
- The <registration> section of the scriptlet sets up the COM registration information; you'll notice the COM component class name and GUID, as well as version information and a general description. (Note that you should generate your own GUID for each scriptlet that you create.)
- The <implements> section declares the public methods that the COM plug-in has to support.
- The <script>section contains the actual implementation:
- The first part of the script section declares the global variables that will be used:
- The strSeparator constant defines the delimiter that is used to separate the data between fields/columns in a text-based log file.
- The blnHeaderRow constant defines whether the first row in a text-based log file contains the names of the fields/columns:
- If set to True, the plug-in will use the data in the first line of the log file to name the fields/columns.
- If set to False, the plug-in will define generic field/column names like "Field1", "Field2", etc.
- The second part of the script contains the required methods:
- The OpenInput() method performs several tasks:
- Locates and opens the log file that you specify in your SQL statement, or returns an error if the log file cannot be found.
- Determines the number, names, and data types of fields/columns in the log file.
- The CloseInput() method cleans up the session by closing the log file and destroying objects.
- The GetFieldCount() method returns the number of fields/columns in the log file.
- The GetFieldName() method returns the name of a field/column in the log file.
- The GetFieldType() method returns the data type of a field/column in the log file. As a reminder, Log Parser supports the following five data types for COM plug-ins: TYPE_INTEGER, TYPE_REAL, TYPE_STRING, TYPE_TIMESTAMP, and TYPE_NULL.
- The GetValue() method returns the data value of a field/column in the log file.
- The ReadRecord() method moves to the next line in the log file. This method returns True if there is additional data to read, or False when the end of data is reached.
- The OpenInput() method performs several tasks:
- The first part of the script section declares the global variables that will be used:
Next, let's look at how to use the sample.
Using the Generic Scriptlet with Log Parser
As a sample log file for this blog, I'm going to use the data in the Sample XML File (books.xml) from MSDN. By running a quick Log Parser query that I will show later, I was able to export data from the XML file into text file named "books.log" that represents an example of a simple log file format that I have had to work with in the past:
id|publish_date|author|title|price
bk101|2000-10-01|Gambardella, Matthew|XML Developer's Guide|44.950000
bk102|2000-12-16|Ralls, Kim|Midnight Rain|5.950000
bk103|2000-11-17|Corets, Eva|Maeve Ascendant|5.950000
bk104|2001-03-10|Corets, Eva|Oberon's Legacy|5.950000
bk105|2001-09-10|Corets, Eva|The Sundered Grail|5.950000
bk106|2000-09-02|Randall, Cynthia|Lover Birds|4.950000
bk107|2000-11-02|Thurman, Paula|Splish Splash|4.950000
bk108|2000-12-06|Knorr, Stefan|Creepy Crawlies|4.950000
bk109|2000-11-02|Kress, Peter|Paradox Lost|6.950000
bk110|2000-12-09|O'Brien, Tim|Microsoft .NET: The Programming Bible|36.950000
bk111|2000-12-01|O'Brien, Tim|MSXML3: A Comprehensive Guide|36.950000
bk112|2001-04-16|Galos, Mike|Visual Studio 7: A Comprehensive Guide|49.950000
In this example, the data is pretty easy to understand - the first row contains the list of field/column names, and the fields/columns are separated by the pipe ("|") character throughout the log file. That being said, you could easily change my sample code to use a different delimiter that your custom log files use.
With that in mind, let's look at some Log Parser examples.
Example #1: Retrieving Data from a Custom Log
The first thing that you should try is to simply retrieve data from your custom plug-in, and the following query should serve as an example:
logparser "SELECT * FROM 'C:\sample\books.log'" -i:COM -iProgID:Generic.LogParser.Scriptlet
The above query will return results like the following:
| id | publish_date | author | title | price | ||||||||||
|---|---|---|---|---|---|---|---|---|---|---|---|---|---|---|
| ----- | ------------------ | -------------------- | ------------------------------------- | --------- | ||||||||||
| bk101 | 10/1/2000 0:00:00 | Gambardella, Matthew | XML Developer's Guide | 44.950000 | ||||||||||
| bk102 | 12/16/2000 0:00:00 | Ralls, Kim | Midnight Rain | 5.950000 | ||||||||||
| bk103 | 11/17/2000 0:00:00 | Corets, Eva | Maeve Ascendant | 5.950000 | ||||||||||
| bk104 | 3/10/2001 0:00:00 | Corets, Eva | Oberon's Legacy | 5.950000 | ||||||||||
| bk105 | 9/10/2001 0:00:00 | Corets, Eva | The Sundered Grail | 5.950000 | ||||||||||
| bk106 | 9/2/2000 0:00:00 | Randall, Cynthia | Lover Birds | 4.950000 | ||||||||||
| bk107 | 11/2/2000 0:00:00 | Thurman, Paula | Splish Splash | 4.950000 | ||||||||||
| bk108 | 12/6/2000 0:00:00 | Knorr, Stefan | Creepy Crawlies | 4.950000 | ||||||||||
| bk109 | 11/2/2000 0:00:00 | Kress, Peter | Paradox Lost | 6.950000 | ||||||||||
| bk110 | 12/9/2000 0:00:00 | O'Brien, Tim | Microsoft .NET: The Programming Bible | 36.950000 | ||||||||||
| bk111 | 12/1/2000 0:00:00 | O'Brien, Tim | MSXML3: A Comprehensive Guide | 36.950000 | ||||||||||
| bk112 | 4/16/2001 0:00:00 | Galos, Mike | Visual Studio 7: A Comprehensive Guide | 49.950000 | ||||||||||
|
||||||||||||||
While the above example works a good proof-of-concept for functionality, it's not overly useful, so let's look at additional examples.
Example #2: Reformatting Log File Data
Once you have established that you can retrieve data from your custom plug-in, you can start taking advantage of Log Parser's features to process your log file data. In this example, I will use several of the built-in functions to reformat the data:
logparser "SELECT id AS ID, TO_DATE(publish_date) AS Date, author AS Author, SUBSTR(title,0,20) AS Title, STRCAT(TO_STRING(TO_INT(FLOOR(price))),SUBSTR(TO_STRING(price),INDEX_OF(TO_STRING(price),'.'),3)) AS Price FROM 'C:\sample\books.log'" -i:COM -iProgID:Generic.LogParser.Scriptlet
The above query will return results like the following:
| ID | Date | Author | Title | Price | ||||||||||
|---|---|---|---|---|---|---|---|---|---|---|---|---|---|---|
| ----- | ---------- | -------------------- | -------------------- | ----- | ||||||||||
| bk101 | 10/1/2000 | Gambardella, Matthew | XML Developer's Guid | 44.95 | ||||||||||
| bk102 | 12/16/2000 | Ralls, Kim | Midnight Rain | 5.95 | ||||||||||
| bk103 | 11/17/2000 | Corets, Eva | Maeve Ascendant | 5.95 | ||||||||||
| bk104 | 3/10/2001 | Corets, Eva | Oberon's Legacy | 5.95 | ||||||||||
| bk105 | 9/10/2001 | Corets, Eva | The Sundered Grail | 5.95 | ||||||||||
| bk106 | 9/2/2000 | Randall, Cynthia | Lover Birds | 4.95 | ||||||||||
| bk107 | 11/2/2000 | Thurman, Paula | Splish Splash | 4.95 | ||||||||||
| bk108 | 12/6/2000 | Knorr, Stefan | Creepy Crawlies | 4.95 | ||||||||||
| bk109 | 11/2/2000 | Kress, Peter | Paradox Lost | 6.95 | ||||||||||
| bk110 | 12/9/2000 | O'Brien, Tim | Microsoft .NET: The | 36.95 | ||||||||||
| bk111 | 12/1/2000 | O'Brien, Tim | MSXML3: A Comprehens | 36.95 | ||||||||||
| bk112 | 4/16/2001 | Galos, Mike | Visual Studio 7: A C | 49.95 | ||||||||||
|
||||||||||||||
This example reformats the dates and prices a little nicer, and it truncates the book titles at 20 characters so they fit a little better on some screens.
Example #3: Processing Log File Data
In addition to simply reformatting your data, you can use Log Parser to group, sort, count, total, etc., your data. The following example illustrates how to use Log Parser to count the number of books by author in the log file:
logparser "SELECT author AS Author, COUNT(Title) AS Books FROM 'C:\sample\books.log' GROUP BY Author ORDER BY Author" -i:COM -iProgID:Generic.LogParser.Scriptlet
The above query will return results like the following:
| Author | Books | ||||||||||
|---|---|---|---|---|---|---|---|---|---|---|---|
| -------------------- | ----- | ||||||||||
| Corets, Eva | 3 | ||||||||||
| Galos, Mike | 1 | ||||||||||
| Gambardella, Matthew | 1 | ||||||||||
| Knorr, Stefan | 1 | ||||||||||
| Kress, Peter | 1 | ||||||||||
| O'Brien, Tim | 2 | ||||||||||
| Ralls, Kim | 1 | ||||||||||
| Randall, Cynthia | 1 | ||||||||||
| Thurman, Paula | 1 | ||||||||||
|
|||||||||||
The results are pretty straight-forward: Log Parser parses the data and presents you with a list of alphabetized authors and the total number of books that were written by each author.
Example #4: Creating Charts
You can also use data from your custom log file to create charts through Log Parser. If I modify the above example, all that I need to do is add a few parameters to create a chart:
logparser "SELECT author AS Author, COUNT(Title) AS Books INTO Authors.gif FROM 'C:\sample\books.log' GROUP BY Author ORDER BY Author" -i:COM -iProgID:Generic.LogParser.Scriptlet -fileType:GIF -groupSize:800x600 -chartType:Pie -categories:OFF -values:ON -legend:ON
The above query will create a chart like the following:

I admit that it's not a very pretty-looking chart - you can look at the other posts in my Log Parser series for some examples about making Log Parser charts more interesting.
Summary
In this blog post and my last post, I have illustrated a few examples that should help developers get started writing their own custom input format plug-ins for Log Parser. As I mentioned in each of the blog posts where I have used scriptlets for the COM objects, I would typically use C# or C++ to create a COM component, but using a scriptlet is much easier for demos because it doesn't require installing Visual Studio and compiling a DLL.
There is one last thing that I would like to mention before I finish this blog; I mentioned earlier that I had used Log Parser to reformat the sample Books.xml file into a generic log file that I could use for the examples in this blog. Since Log Parser supports XML as an input format and it allows you to customize your output, I wrote the following simple Log Parser query to reformat the XML data into a format that I had often seen used for text-based log files:
logparser.exe "SELECT id,publish_date,author,title,price INTO books.log FROM books.xml" -i:xml -o:tsv -headers:ON -oSeparator:"|"
Actually, this ability to change data formats is one of the hidden gems of Log Parser; I have often used Log Parser to change the data from one type of log file to another - usually so that a different program can access the data. For example, if you were given the log file with a pipe ("|") delimiter like I used as an example, you could easily use Log Parser to convert that data into the CSV format so you could open it in Excel:
logparser.exe "SELECT id,publish_date,author,title,price INTO books.csv FROM books.log" -i:tsv -o:csv -headers:ON -iSeparator:"|" -oDQuotes:on
I hope these past few blog posts help you to get started writing your own custom input format plug-ins for Log Parser.
That's all for now. ;-)
Note: This blog was originally posted at http://blogs.msdn.com/robert_mcmurray/
Advanced Log Parser Part 6 - Creating a Simple Custom Input Format Plug-In
27 February 2013 • by Bob • LogParser, Scripting
In Part 4 of this series, I illustrated how to create a new COM-based input provider for Log Parser from a custom input format:
Advanced Log Parser Charts Part 4 - Adding Custom Input Formats
For the sample that I published in that blog, I wrote a plug-in that consumed FTP RSCA events, which is highly structured data, and it added a lot of complexity to my example. In the past ten months or so since I published my original blog, I've had several requests for additional information about how to get started writing COM-based input formats for Log Parser, so it occurred to me that perhaps I could have shown a simpler example to get people started instead of diving straight into parsing RSCA data. ;-)
With that in mind, I thought that I would write a couple of blog posts with simpler examples to help anyone who wants to get started writing custom input formats for Log Parser.
For this blog post, I will show you how to create a very basic COM-based input format provider for Log Parser that simply returns static data; you could use this sample as a template to quickly get up-and-running with the basic concepts. (I promise to follow this blog with another real-world example that is still easier-to-use than my RSCA example.)
A Reminder about Creating COM-based plug-ins for Log Parser
In the blog that I referred to earlier, I mentioned that a COM plug-in has to support the following public methods:
| Method Name | Description |
|---|---|
OpenInput |
Opens your data source and sets up any initial environment settings. |
GetFieldCount |
Returns the number of fields that your plug-in will provide. |
GetFieldName |
Returns the name of a specified field. |
GetFieldType |
Returns the datatype of a specified field. |
GetValue |
Returns the value of a specified field. |
ReadRecord |
Reads the next record from your data source. |
CloseInput |
Closes your data source and cleans up any environment settings. |
Once you have created and registered a COM plug-in, you call it by using something like the following syntax:
logparser.exe "SELECT * FROM FOO" -i:COM -iProgID:BAR
In the preceding example, FOO is a data source that makes sense to your plug-in, and BAR is the COM class name for your plug-in.
Creating a Simple COM plug-in for Log Parser
Once again, I'm going to demonstrate how to create a COM component by using a scriptlet, which I like to use for demos because they are quick to design, they're easily portable, and updates take place immediately since no compilation is required. (All of that being said, if I were writing a real COM plug-in for Log Parser, I would use C# or C++.)
To create the sample COM plug-in, copy the following code into a text file, and save that file as "Simple.LogParser.Scriptlet.sct" to your computer. (Note: The *.SCT file extension tells Windows that this is a scriptlet file.)
<SCRIPTLET>
  <registration
    Description="Simple Log Parser Scriptlet"
    Progid="Simple.LogParser.Scriptlet"
    Classid="{4e616d65-6f6e-6d65-6973-526f62657274}"
    Version="1.00"
    Remotable="False" />
  <comment>
  EXAMPLE: logparser "SELECT * FROM FOOBAR" -i:COM -iProgID:Simple.LogParser.Scriptlet
  </comment>
  <implements id="Automation" type="Automation">
    <method name="OpenInput">
      <parameter name="strValue"/>
    </method>
    <method name="GetFieldCount" />
    <method name="GetFieldName">
      <parameter name="intFieldIndex"/>
    </method>
    <method name="GetFieldType">
      <parameter name="intFieldIndex"/>
    </method>
    <method name="ReadRecord" />
    <method name="GetValue">
      <parameter name="intFieldIndex"/>
    </method>
    <method name="CloseInput">
      <parameter name="blnAbort"/>
    </method>
  </implements>
  <SCRIPT LANGUAGE="VBScript">

Option Explicit

Const MAX_RECORDS = 5
Dim intRecordCount

' --------------------------------------------------------------------------------
' Open the input session.
' --------------------------------------------------------------------------------

Public Function OpenInput(strValue)
    intRecordCount = 0
End Function

' --------------------------------------------------------------------------------
' Close the input session.
' --------------------------------------------------------------------------------

Public Function CloseInput(blnAbort)
End Function

' --------------------------------------------------------------------------------
' Return the count of fields.
' --------------------------------------------------------------------------------

Public Function GetFieldCount()
    GetFieldCount = 5
End Function

' --------------------------------------------------------------------------------
' Return the specified field's name.
' --------------------------------------------------------------------------------

Public Function GetFieldName(intFieldIndex)
    Select Case CInt(intFieldIndex)
        Case 0:
            GetFieldName = "INTEGER"
        Case 1:
            GetFieldName = "REAL"
        Case 2:
            GetFieldName = "STRING"
        Case 3:
            GetFieldName = "TIMESTAMP"
        Case 4:
            GetFieldName = "NULL"
        Case Else
            GetFieldName = Null
    End Select
End Function

' --------------------------------------------------------------------------------
' Return the specified field's type.
' --------------------------------------------------------------------------------

Public Function GetFieldType(intFieldIndex)
    ' Define the field type constants.
    Const TYPE_INTEGER   = 1
    Const TYPE_REAL      = 2
    Const TYPE_STRING    = 3
    Const TYPE_TIMESTAMP = 4
    Const TYPE_NULL      = 5
    Select Case CInt(intFieldIndex)
        Case 0:
            GetFieldType = TYPE_INTEGER
        Case 1:
            GetFieldType = TYPE_REAL
        Case 2:
            GetFieldType = TYPE_STRING
        Case 3:
            GetFieldType = TYPE_TIMESTAMP
        Case 4:
            GetFieldType = TYPE_NULL
        Case Else
            GetFieldType = Null
    End Select
End Function

' --------------------------------------------------------------------------------
' Return the specified field's value.
' --------------------------------------------------------------------------------

Public Function GetValue(intFieldIndex)
    Select Case CInt(intFieldIndex)
        Case 0:
            GetValue = 1
        Case 1:
            GetValue = 1.0
        Case 2:
            GetValue = "One"
        Case 3:
            GetValue = Now
        Case Else
            GetValue = Null
    End Select
End Function

' --------------------------------------------------------------------------------
' Read the next record, and return true or false if there is more data.
' --------------------------------------------------------------------------------

Public Function ReadRecord()
    intRecordCount = intRecordCount + 1
    If intRecordCount <= MAX_RECORDS Then
        ReadRecord = True
    Else
        ReadRecord = False
    End If
End Function

  </SCRIPT>

</SCRIPTLET>
After you have saved the scriptlet code to your computer, you register it by using the following syntax:
regsvr32 Simple.LogParser.Scriptlet.sct
At the very minimum, you can now use the COM plug-in with Log Parser by using syntax like the following:
logparser "SELECT * FROM FOOBAR" -i:COM -iProgID:Simple.LogParser.Scriptlet
This will return results like the following:
INTEGER | REAL | STRING | TIMESTAMP | NULL |
|---|---|---|---|---|
------- | -------- | ------ | ------------------ | ---- |
1 |
1.000000 |
One |
2/26/2013 19:42:12 |
- |
1 |
1.000000 |
One |
2/26/2013 19:42:12 |
- |
1 |
1.000000 |
One |
2/26/2013 19:42:12 |
- |
1 |
1.000000 |
One |
2/26/2013 19:42:12 |
- |
1 |
1.000000 |
One |
2/26/2013 19:42:12 |
- |
Statistics: |
||||
----------- |
||||
Elements processed: |
5 |
|||
Elements output: |
5 |
|||
Execution time: |
0.01 seconds |
Next, let's analyze what this sample does.
Examining the Sample Scriptlet Contents in Detail
Here are the different parts of the scriptlet and what they do:
- The <registration> section of the scriptlet sets up the COM registration information; you'll notice the COM component class name and GUID, as well as version information and a general description. (Note that you should generate your own GUID for each scriptlet that you create.)
- The <implements> section declares the public methods that the COM plug-in has to support.
- The <script>section contains the actual implementation:
- The
OpenInput()method opens your data source, although in this example it only initializes the record count. (Note that the value that is passed to the method will be ignored in this example.) - The
CloseInput()method would normally clean up your session, (e.g. close a data file or database, etc.), but it doesn't do anything in this example. - The
GetFieldCount()method returns the number of data fields in each record of your data, which is static in this example. - The
GetFieldName()method returns the name of a field that is passed to the method as a number; the names are static in this example. - The
GetFieldType()method returns the data type of a field that is passed to the method as a number, which are statically-defined in this example. As a reminder, Log Parser supports the following five data types for COM plug-ins:TYPE_INTEGER,TYPE_REAL,TYPE_STRING,TYPE_TIMESTAMP, andTYPE_NULL. - The
GetValue()method returns the data value of a field that is passed to the method as a number. Once again, the data values are statically-defined in this example. - The
ReadRecord()method moves to the next record in your data set; this method returns True if there is data to read, or False when the end of data is reached. In this example, the method increments the record counter and sets the status based on whether the maximum number of records has been reached.
- The
Summary
That wraps up the simplest example that I could put together of a COM-based input provider for Log Parser. In my next blog, I'll show how to create a generic COM-based input provider for Log Parser that you can use to parse text-based log files.
Note: This blog was originally posted at http://blogs.msdn.com/robert_mcmurray/
Advanced Log Parser Charts Part 5 - Creating a Generic Chart Color Script
25 August 2012 • by Bob • LogParser, Scripting
In Part 5 of this series, I'll show you how to create a generic script that you can use to add some color to your Log Parser charts. As I mentioned in Part 1 of this series, the default colors for Log parser charts are really dull and boring. For example, if I parse one month's worth of log files from one of my low-volume websites with the following query:
logparser.exe "SELECT date,COUNT(*) AS Hits INTO HITS.gif FROM *.log GROUP BY date ORDER BY date" -i:w3c -o:CHART -chartType:ColumnClustered -chartTitle:"" -q:ON
Log Parser will create the following ugly daily hits chart:

Generic Color Change Script
Here's the background story for this blog: I have a collection of scripts that I use to format my charts, several of which have faithfully served as the fodder for this blog series. With that in mind, I had a situation recently where I was querying logs with a series of data just like this, and of course the resulting charts were kind of hideous to look at. In one of the scripts that I often use, I create an array of colors to use, and then I apply the various colors to the individual data points in the series.
In the past I have always hard-coded the length for the array of colors based on the data that I am working with, but in this situation I had no idea how many data points I would have, so I decided to put together a quick script with an array that would work with a series of any size.
Here's the resulting script:
// Set a default color for the chart's data.
chart.SeriesCollection(0).Interior.Color = "#ffcccc";

// Define a short array of colors.
var colors = [
    "#ffff99", "#ff99ff", "#ff9999",
    "#99ffff", "#99ff99", "#9999ff",
    "#ffffcc", "#ffccff", "#ffcccc",
    "#ccffff", "#ccffcc", "#ccccff"
];

// Loop through the data points in the series.
for (x=0;x<chart.SeriesCollection(0).Points.Count;++x)
{
    // Set the color for the data point based on modulo division of the array length.
    chart.SeriesCollection(0).Points(x).Interior.Color = colors[x % colors.length ];
}
That's all that there is to the script - it's pretty simple. If I take the above script and save it as "FormatChart.js", I can use that script with my Log Parser query from earlier by adding an extra parameter to the command:
logparser.exe "SELECT date,COUNT(*) AS Hits INTO HITS.gif FROM *.log GROUP BY date ORDER BY date" -i:w3c -o:CHART -chartType:ColumnClustered -chartTitle:"" -q:ON -config:FormatChart.js
Now Log Parser will create the following daily hits chart with a great deal more color to it:

Okay - perhaps that's not the best color palette, but you get the idea. It looks even better when I change the query to use 3D charts:
logparser.exe "SELECT date,COUNT(*) AS Hits INTO HITS.gif FROM *.log GROUP BY date ORDER BY date" -i:w3c -o:CHART -chartType:Column3D -chartTitle:"" -q:ON -config:FormatChart.js
The above query creates the following chart:

Color Changing Pie Charts
I'd like to make a quick change to the script in order to make it work a little better with a pie chart:
// Set a default color for the chart's data.
chart.SeriesCollection(0).Interior.Color = "#cccccc";

// Define a short array of colors.
var colors = [
    "#cc3333", "#3333cc", "#33cc33",
    "#33cccc", "#cccc33", "#cc33cc"
];

// Loop through the data points in the series.
for (x=0;x<chart.SeriesCollection(0).Points.Count;++x)
{
    // Set the color for the data point based on modulo division of the array length.
    chart.SeriesCollection(0).Points(x).Interior.Color = colors[x % colors.length ];
}
// Rotate the chart 180 degrees - just so it looks a little better.
chartSpace.Charts(0).PlotArea.RotateClockwise();
chartSpace.Charts(0).PlotArea.RotateClockwise();
For this query I'd like to see a break down by HTTP status, and this necessitates some small change to the Log parser query:
logparser.exe "SELECT sc-status AS Status,COUNT(*) AS Hits INTO HITS.gif FROM *.log GROUP BY Status ORDER BY Status" -i:w3c -o:CHART -chartType:PieExploded3D -chartTitle:"" -q:ON -config:FormatChart.js
The above query creates the following chart:

Summary
That wraps it up for this blog - I hope that I've given you some ideas for ways that you can easily add some colors to some dull-looking Log Parser charts.
Note: This blog was originally posted at http://blogs.msdn.com/robert_mcmurray/
Advanced Log Parser Charts Part 2 - Using Gradient Colors for Area Charts
29 January 2012 • by Bob • IIS, LogParser, Scripting
In Part 2 of this series, I'll show you how to customize the area chart from Part 1 to show the chart area with a gradient. More specifically, there are three different chart gradient methods that we'll take a look at in this blog post:
Before I continue, there is one quick Log Parser convention that you should realize: there are two objects that Log Parser will create and pass to your script. As you look at the sample scripts in this post, you will see these objects in use:
| Object Name | Description | Example |
|---|---|---|
chartSpace |
This is the base chart workspace object. |
// Set the border style for the chart. |
chart |
This is equivalent to the chartSpace.Charts(0) object. |
// Change the background color. |
Before I get started, here's a quick review of VBScript that uses Log Parser COM objects:
Option Explicit
' Declare the variables.
Dim objLogQuery, strSQL
Dim objInputW3CFormat, objOutputChartFormat
' Create the Log Parser objects.
Set objLogQuery = WScript.CreateObject("MSUtil.LogQuery")
Set objInputW3CFormat = WScript.CreateObject("MSUtil.LogQuery.W3CInputFormat")
Set objOutputChartFormat = WScript.CreateObject("MSUtil.LogQuery.ChartOutputFormat")
' Define the SQL query.
strSQL = "SELECT Date, COUNT(*) AS Hits " & _
" INTO _Part2.gif " & _
" FROM *.log " & _
" GROUP BY Date " & _
" ORDER BY Date"
' Specify the chart options.
objOutputChartFormat.groupSize = "800x600"
objOutputChartFormat.fileType = "GIF"
objOutputChartFormat.chartType = "Area"
objOutputChartFormat.categories = "ON"
objOutputChartFormat.values = "ON"
objOutputChartFormat.legend = "OFF"
' Execute the SQL statement to create the chart.
objLogQuery.ExecuteBatch strSQL, objInputW3CFormat, objOutputChartFormat
As I mentioned in Part 1 of this series, you don't have to use the COM objects, but I chose to do so for this blog series because it makes it a little easier to script. That being said, if I use one month's worth of log files from one of my low-volume websites, Log Parser and this VBScript creates the following rather ugly daily hits chart:

With all of this in mind, let's take a look at some simple configuration scripts.
Setting Fonts and Titles and Such...
The above chart really needs some help, so the first thing that we'll do is change a few things. First things first, we need to specify the name of the chart configuration script in the VBScript sample:
Option Explicit
' Declare the variables.
Dim objLogQuery, strSQL
Dim objInputW3CFormat, objOutputChartFormat
' Create the Log Parser objects.
Set objLogQuery = WScript.CreateObject("MSUtil.LogQuery")
Set objInputW3CFormat = WScript.CreateObject("MSUtil.LogQuery.W3CInputFormat")
Set objOutputChartFormat = WScript.CreateObject("MSUtil.LogQuery.ChartOutputFormat")
' Define the SQL query.
strSQL = "SELECT Date, COUNT(*) AS Hits " & _
" INTO Part2.gif " & _
" FROM *.log " & _
" GROUP BY Date " & _
" ORDER BY Date"
' Specify the chart options.
objOutputChartFormat.groupSize = "800x600"
objOutputChartFormat.fileType = "GIF"
objOutputChartFormat.chartType = "Area"
objOutputChartFormat.categories = "ON"
objOutputChartFormat.values = "ON"
objOutputChartFormat.legend = "OFF"
objOutputChartFormat.config = "Part2.js"
' Execute the SQL statement to create the chart.
objLogQuery.ExecuteBatch strSQL, objInputW3CFormat, objOutputChartFormat
Next, we need to create the actual chart configuration script, which I wrote in JavaScript; you will need to save this as "Part2.js" in order to use my samples:
// Set the title above the chart.
chart.HasTitle = true;
chart.Title.Caption = "Hits by Day"
// Set the border style for the chart.
chartSpace.Border.Color = "#000000";
chartSpace.Border.Weight = 2;
// Change the background color for the plot area.
chart.PlotArea.Interior.Color = "#f0f0f0";
// Set the font size for the chart values.
chart.SeriesCollection(0).DataLabelsCollection(0).Font.Size = 6;
// Get the start and end dates from the X axis.
var startDate = chart.Axes(0).CategoryLabels.Item(0).Caption;
var endDate = chart.Axes(0).CategoryLabels.Item(chart.Axes(0).CategoryLabels.ItemCount-1).Caption;
// Set the caption below the chart.
chartSpace.HasChartSpaceTitle = true;
chartSpace.ChartSpaceTitle.Caption =
"This chart shows the hits by day from "
+ startDate + " to " + endDate + ".";
chartSpace.ChartSpaceTitle.Font.Size = 10;
chartSpace.ChartSpaceTitle.Position = chartSpace.Constants.chTitlePositionBottom;
// Set the style and caption for the Y axis.
chart.Axes(0).Font.Size = 8;
chart.Axes(0).HasTitle = true;
chart.Axes(0).Title.Caption = "Dates";
chart.Axes(0).Title.Font.Size = 9;
// Set the style and caption for the X axis.
chart.Axes(1).Font.Size = 7;
chart.Axes(1).HasTitle = true;
chart.Axes(1).Title.Caption = "Hits";
chart.Axes(1).Title.Font.Size = 9;
This chart configuration script does several things:
- Sets the title above the chart to "Hits by Day"
- Sets a black border style for the chart
- Sets the background color for the plot area to a light gray
- Sets the font size for the chart values to 6-point
- Sets the caption below the chart for the start and end date
- Sets the font styles and captions for the Y and Y axes
When you run the VBScript, the resulting chart looks like the following:

This looks a little more legible, but now let's look at setting some colors.
Setting a One-Color Gradient
Using the same JavaScript sample from earlier, we just need to make a couple of changes to the chart configuration script in order to use the SetOneColorGradient method:
// Set the title above the chart.
chart.HasTitle = true;
chart.Title.Caption = "Hits by Day"

// Set the border style for the chart.
chartSpace.Border.Color = "#000000";
chartSpace.Border.Weight = 2;

// Change the background color for the plot area.
chart.PlotArea.Interior.Color = "#f0f0f0";

// Specify the chart gradient styles.
chart.SeriesCollection(0).Interior.SetOneColorGradient(
 chartSpace.Constants.chGradientHorizontal,
 chartSpace.Constants.chGradientVariantEnd,
 1.0,
 "#ff0000");

// Set the font size for the chart values.
chart.SeriesCollection(0).DataLabelsCollection(0).Font.Size = 6;

// Get the start and end dates from the X axis.
var startDate = chart.Axes(0).CategoryLabels.Item(0).Caption;
var endDate = chart.Axes(0).CategoryLabels.Item(chart.Axes(0).CategoryLabels.ItemCount-1).Caption;

// Set the caption below the chart.
chartSpace.HasChartSpaceTitle = true;
chartSpace.ChartSpaceTitle.Caption =
    "This chart shows the hits by day from "
    + startDate + " to " + endDate + ".";
chartSpace.ChartSpaceTitle.Font.Size = 10;
chartSpace.ChartSpaceTitle.Position = chartSpace.Constants.chTitlePositionBottom;

// Set the style and caption for the Y axis.
chart.Axes(0).Font.Size = 8;
chart.Axes(0).HasTitle = true;
chart.Axes(0).Title.Caption = "Dates";
chart.Axes(0).Title.Font.Size = 9;

// Set the style and caption for the X axis.
chart.Axes(1).Font.Size = 7;
chart.Axes(1).HasTitle = true;
chart.Axes(1).Title.Caption = "Hits";
chart.Axes(1).Title.Font.Size = 9;
When you run the VBScript, this renders a chart that looks like the following:

There are four parameters for the SetOneColorGradient method to look at:
| Parameter | Description |
|---|---|
GradientStyle |
This is a value from the ChartGradientStyleEnum enumeration, which specifies how the gradient will be displayed. For example: horizontally, vertically, diagonally, etc. |
GradientVariant |
This is a value from the ChartGradientVariantEnum enumeration, which specifies which direction the gradient will be displayed. For example: lighter to darker, from the inside to the outside, etc. |
GradientDegree |
This is a double value from 0.0 to 1.0, which specifies whether the gradient will range from the color to lighter or darker shades. |
Color |
This is a string that specifies the color. This can be a commonly-named color, such as "red," "blue," etc., or this can be an RGB hexadecimal value, such as "#ff0000" (red), "#0000ff" (blue), etc. (See my 216-Color Safe Web Palette blog post for a large series of hexadecimal color values.) |
Let's make some quick changes to parameters that we are passing to the SetOneColorGradient method and alter a few of the colors:
// Set the title above the chart.
chart.HasTitle = true;
chart.Title.Caption = "Hits by Day"

// Set the border style for the chart.
chartSpace.Border.Color = "#000000";
chartSpace.Border.Weight = 2;

// Change the background color for the plot area.
chart.PlotArea.Interior.Color = "#333333";

// Specify the chart gradient styles.
chart.SeriesCollection(0).Interior.SetOneColorGradient(
    chartSpace.Constants.chGradientHorizontal,
    chartSpace.Constants.chGradientVariantStart,
    0.0,
    "#00ff00");

// Set the font size for the chart values.
chart.SeriesCollection(0).DataLabelsCollection(0).Font.Size = 6;
chart.SeriesCollection(0).DataLabelsCollection(0).Font.Color = "#ffffff";

// Get the start and end dates from the X axis.
var startDate = chart.Axes(0).CategoryLabels.Item(0).Caption;
var endDate = chart.Axes(0).CategoryLabels.Item(chart.Axes(0).CategoryLabels.ItemCount-1).Caption;

// Set the caption below the chart.
chartSpace.HasChartSpaceTitle = true;
chartSpace.ChartSpaceTitle.Caption =
    "This chart shows the hits by day from "
    + startDate + " to " + endDate + ".";
chartSpace.ChartSpaceTitle.Font.Size = 10;
chartSpace.ChartSpaceTitle.Position = chartSpace.Constants.chTitlePositionBottom;

// Set the style and caption for the Y axis.
chart.Axes(0).Font.Size = 8;
chart.Axes(0).HasTitle = true;
chart.Axes(0).Title.Caption = "Dates";
chart.Axes(0).Title.Font.Size = 9;

// Set the style and caption for the X axis.
chart.Axes(1).Font.Size = 7;
chart.Axes(1).HasTitle = true;
chart.Axes(1).Title.Caption = "Hits";
chart.Axes(1).Title.Font.Size = 9;
When you run the VBScript, that results in the following considerably cooler-looking chart:

Setting a Two-Color Gradient
The SetTwoColorGradient method offers more color flexibility than the one-color gradient method, and we only need to make a couple of changes to the JavaScript for the chart configuration script in order to use the new method:
// Set the title above the chart.
chart.HasTitle = true;
chart.Title.Caption = "Hits by Day"

// Set the border style for the chart.
chartSpace.Border.Color = "#000000";
chartSpace.Border.Weight = 2;

// Change the background color for the plot area.
chart.PlotArea.Interior.Color = "#FFFF99";

// Specify the chart gradient styles.
chart.SeriesCollection(0).Interior.SetTwoColorGradient(
 chartSpace.Constants.chGradientVertical,
 chartSpace.Constants.chGradientVariantStart,
 "#0066FF",
 "#00FFCC");

// Set the font size for the chart values.
chart.SeriesCollection(0).DataLabelsCollection(0).Font.Size = 6;

// Get the start and end dates from the X axis.
var startDate = chart.Axes(0).CategoryLabels.Item(0).Caption;
var endDate = chart.Axes(0).CategoryLabels.Item(chart.Axes(0).CategoryLabels.ItemCount-1).Caption;

// Set the caption below the chart.
chartSpace.HasChartSpaceTitle = true;
chartSpace.ChartSpaceTitle.Caption =
    "This chart shows the hits by day from "
    + startDate + " to " + endDate + ".";
chartSpace.ChartSpaceTitle.Font.Size = 10;
chartSpace.ChartSpaceTitle.Position = chartSpace.Constants.chTitlePositionBottom;

// Set the style and caption for the Y axis.
chart.Axes(0).Font.Size = 8;
chart.Axes(0).HasTitle = true;
chart.Axes(0).Title.Caption = "Dates";
chart.Axes(0).Title.Font.Size = 9;

// Set the style and caption for the X axis.
chart.Axes(1).Font.Size = 7;
chart.Axes(1).HasTitle = true;
chart.Axes(1).Title.Caption = "Hits";
chart.Axes(1).Title.Font.Size = 9;
When you run the VBScript, this will create the following chart:

There are four parameters for the SetTwoColorGradient method to consider:
| Parameter | Description |
|---|---|
GradientStyle |
This is a value from the ChartGradientStyleEnum enumeration, which specifies how the gradient will be displayed. For example: horizontally, vertically, diagonally, etc. |
GradientVariant |
This is a value from the ChartGradientVariantEnum enumeration, which specifies which direction the gradient will be displayed. For example: lighter to darker, from the inside to the outside, etc. |
Color |
This is a string that specifies the first color for the gradient; this can be a commonly-named color, such as "red," "blue," etc., or this can be an RGB hexadecimal value, such as "#ff0000" (red), "#0000ff" (blue), etc. (See my 216-Color Safe Web Palette blog post for a large series of hexadecimal color values.) |
BackColor |
This is a string that specifies the second color for the gradient; this can be a value like the Color parameter. |
Using a Preset Gradient
There is an additional gradient method that uses a collection of preset color palettes; this method is appropriately named SetPresetGradient. Once again, we need to make a couple of changes to the JavaScript for the chart configuration script in order to use the new method:
// Set the title above the chart.
chart.HasTitle = true;
chart.Title.Caption = "Hits by Day"

// Set the border style for the chart.
chartSpace.Border.Color = "#000000";
chartSpace.Border.Weight = 2;

// Change the background color for the plot area.
chart.PlotArea.Interior.Color = "#EEFFDD";

// Specify the chart gradient styles.
chart.SeriesCollection(0).Interior.SetPresetGradient(
 chartSpace.Constants.chGradientHorizontal,
 chartSpace.Constants.chGradientVariantStart,
 chartSpace.Constants.chGradientFire);

// Set the font size for the chart values.
chart.SeriesCollection(0).DataLabelsCollection(0).Font.Size = 6;

// Get the start and end dates from the X axis.
var startDate = chart.Axes(0).CategoryLabels.Item(0).Caption;
var endDate = chart.Axes(0).CategoryLabels.Item(chart.Axes(0).CategoryLabels.ItemCount-1).Caption;

// Set the caption below the chart.
chartSpace.HasChartSpaceTitle = true;
chartSpace.ChartSpaceTitle.Caption =
    "This chart shows the hits by day from "
    + startDate + " to " + endDate + ".";
chartSpace.ChartSpaceTitle.Font.Size = 10;
chartSpace.ChartSpaceTitle.Position = chartSpace.Constants.chTitlePositionBottom;

// Set the style and caption for the Y axis.
chart.Axes(0).Font.Size = 8;
chart.Axes(0).HasTitle = true;
chart.Axes(0).Title.Caption = "Dates";
chart.Axes(0).Title.Font.Size = 9;

// Set the style and caption for the X axis.
chart.Axes(1).Font.Size = 7;
chart.Axes(1).HasTitle = true;
chart.Axes(1).Title.Caption = "Hits";
chart.Axes(1).Title.Font.Size = 9;
When you run the VBScript, this will create the following chart:

There are three parameters for the SetPresetGradient method to look at:
| Parameter | Description |
|---|---|
GradientStyle |
This is a value from the ChartGradientStyleEnum enumeration, which specifies how the gradient will be displayed. For example: horizontally, vertically, diagonally, etc. |
GradientVariant |
This is a value from the ChartGradientVariantEnum enumeration, which specifies which direction the gradient will be displayed. For example: lighter to darker, from the inside to the outside, etc. |
GradientPreset |
This is a value from the ChartPresetGradientTypeEnum enumeration, which specifies the gradient preset palette. |
There are several of preset gradients in the ChartPresetGradientTypeEnum enumeration, and a little experimentation will yield the best results.
Using 3-D Area Charts
For one last sample, I'd like to show you what gradients can do for your 3-D area charts. To do so, we first need to make a couple of small changes the VBScript that will create the chart:
Option Explicit

' Declare the variables.
Dim objLogQuery, strSQL
Dim objInputW3CFormat, objOutputChartFormat

' Create the Log Parser objects.
Set objLogQuery = WScript.CreateObject("MSUtil.LogQuery")
Set objInputW3CFormat = WScript.CreateObject("MSUtil.LogQuery.W3CInputFormat")
Set objOutputChartFormat = WScript.CreateObject("MSUtil.LogQuery.ChartOutputFormat")

' Define the SQL query.
strSQL = "SELECT Date, COUNT(*) AS Hits " & _
    " INTO _Part2.gif " & _
    " FROM *.log " & _
    " GROUP BY Date " & _
    " ORDER BY Date"

' Specify the chart options.
objOutputChartFormat.groupSize = "1024x768"
objOutputChartFormat.fileType = "GIF"
objOutputChartFormat.chartType = "Area3D"
objOutputChartFormat.categories = "ON"
objOutputChartFormat.values = "ON"
objOutputChartFormat.legend = "OFF"
objOutputChartFormat.config = "Part2.js"

' Execute the SQL statement to create the chart.
objLogQuery.ExecuteBatch strSQL, objInputW3CFormat, objOutputChartFormat
Next, we need to update the JavaScript for the chart configuration script to work with the new VBScript; for the most part, I'm just updating font sizes and chart colors:
// Set the title above the chart.
chart.HasTitle = true;
chart.Title.Caption = "Hits by Day"

// Clear the caption for the chart series.
chart.SeriesCollection(0).Caption = "";

// Set the border style for the chart.
chartSpace.Border.Color = "#000000";
chartSpace.Border.Weight = 2;

// Change the background color for the plot area.
chart.PlotArea.Interior.Color = "#FFFFCC";

// Specify the chart gradient styles.
chart.SeriesCollection(0).Interior.SetTwoColorGradient(
    chartSpace.Constants.chGradientHorizontal,
    chartSpace.Constants.chGradientVariantEnd,
    "#00CCFF",
    "#FFFFFF");

// Set the font size for the chart values.
chart.SeriesCollection(0).DataLabelsCollection(0).Font.Size = 7;

// Get the start and end dates from the X axis.
var startDate = chart.Axes(0).CategoryLabels.Item(0).Caption;
var endDate = chart.Axes(0).CategoryLabels.Item(chart.Axes(0).CategoryLabels.ItemCount-1).Caption;

// Set the caption below the chart.
chartSpace.HasChartSpaceTitle = true;
chartSpace.ChartSpaceTitle.Caption =
    "This chart shows the hits by day from "
    + startDate + " to " + endDate + ".";
chartSpace.ChartSpaceTitle.Font.Size = 10;
chartSpace.ChartSpaceTitle.Position = chartSpace.Constants.chTitlePositionBottom;

// Set the style and caption for the Y axis.
chart.Axes(0).Font.Size = 10;
chart.Axes(0).HasTitle = true;
chart.Axes(0).Title.Caption = "Dates";
chart.Axes(0).Title.Font.Size = 11;

// Set the style and caption for the X axis.
chart.Axes(1).Font.Size = 9;
chart.Axes(1).HasTitle = true;
chart.Axes(1).Title.Caption = "Hits";
chart.Axes(1).Title.Font.Size = 11;
When you run the VBScript, this will create the following chart:

Summary
In this blog post, I've written a lot of code samples in order to show you four different ways to set gradients for your Log Parser area charts. In future posts, I'll show you how to do some more cool things with some other types of charts.
;-]
Note: This blog was originally posted at http://blogs.msdn.com/robert_mcmurray/
Advanced Log Parser Charts Part 1 - Working With Configuration Scripts
28 January 2012 • by Bob • IIS, LogParser, Scripting
I recently had a situation where I wanted to customize the chart output from Log Parser, and after a bunch of research I eventually arrived at the conclusion that configuration scripts to create customized charts are probably the least-documented feature of Log Parser. After a lot of experimentation, (and a bit of frustration), I finally managed to achieve the results that I wanted. With that in mind, I thought that it would make a great blog series if I documented some of the settings that I used.
Log Parser and Chart Configuration Scripts
When you look in the Log Parser help file, it makes mention of using configuration scripts to customize charts, and it provides the following small JavaScript sample:
// Add a caption
chartSpace.HasChartSpaceTitle = true;
chartSpace.ChartSpaceTitle.Caption = "Generated by Log Parser 2.2";
chartSpace.ChartSpaceTitle.Font.Size = 6;
chartSpace.ChartSpaceTitle.Position = chartSpace.Constants.chTitlePositionBottom;

// Change the background color
chart.PlotArea.Interior.Color = chartSpace.Constants.chColorNone;
Unfortunately, this sample isn't very useful, although I found dozens of forum posts that quote this sample as a way to do things - but it's the only sample that most people cite. The Log Parser help file mentions looking at the MSDN ChartSpace Object Model documentation, but that documentation is only slightly more useful. These two references are what led me to my earlier conclusion that chart configuration scripts are not well-documented, and especially when you are trying to do something with Log Parser.
What I found to be particularly helpful was to use the Log Parser COM interface and write scripts by using Adersoft's VbsEdit and JsEdit. In case you haven't used either of those applications, they are great IDEs for writing scripts; they both give you a great debugging environment, and they have a great object browser that I used to discover what options were available to me. In the end, these two editors made it possible to create the chart configuration scripts that I will discuss in this blog series.
By the way, chart configuration scripts can be written in VBScript or JavaScript, but for this blog I will use VBScript for the Log Parser COM samples and JavaScript for the configuration script samples. I didn't have to do it that way, but it seemed like a good idea to help differentiate between the samples.
Using COM versus the Command-Line
For the samples in this blog series, I will use Log Parser's COM interface and VBScript to create my charts, but this is not necessary; everything that I am documenting can be done from the command-line version of Log parser, and I'll give you some quick examples to see the differences.
The following examples generate some simple area charts that plot the total number of hits by day, and both examples do exactly the same thing:
Command-Line:
logparser.exe "
COM Interface:
Option Explicit

Dim objLogQuery, strSQL
Dim objInputW3CFormat, objOutputChartFormat

Set objLogQuery = WScript.CreateObject("MSUtil.LogQuery")
Set objInputW3CFormat = WScript.CreateObject("MSUtil.LogQuery.W3CInputFormat")
Set objOutputChartFormat = WScript.CreateObject("MSUtil.LogQuery.ChartOutputFormat")

strSQL = "SELECT Date, COUNT(*) AS Hits " & _
    " INTO HitsByDay.gif " & _
    " FROM *.log " & _
    " GROUP BY Date " & _
    " ORDER BY Date"

objOutputChartFormat.groupSize = "800x600"
objOutputChartFormat.fileType = "GIF"
objOutputChartFormat.chartType = "Area"
objOutputChartFormat.categories = "ON"
objOutputChartFormat.values = "ON"
objOutputChartFormat.legend = "OFF"

objLogQuery.ExecuteBatch strSQL, objInputW3CFormat, objOutputChartFormat
Ugly Charts
Using some of the log files from one of my websites, the above samples created the following basic chart:

Taking a look at this chart makes it easy to see why you would want to customize your output; that light blue is pretty awful, and those values are pretty hard to read.
Specifying Configuration Scripts
If you remember the incredibly basic configuration script from earlier, you only need to add one parameter to each example in order to specify the configuration script:
Command-Line:
logparser.exe "
COM Interface:
Option Explicit

Dim objLogQuery, strSQL
Dim objInputW3CFormat, objOutputChartFormat

Set objLogQuery = WScript.CreateObject("MSUtil.LogQuery")
Set objInputW3CFormat = WScript.CreateObject("MSUtil.LogQuery.W3CInputFormat")
Set objOutputChartFormat = WScript.CreateObject("MSUtil.LogQuery.ChartOutputFormat")

strSQL = "SELECT Date, COUNT(*) AS Hits " & _
    " INTO HitsByDay.gif " & _
    " FROM *.log " & _
    " GROUP BY Date " & _
    " ORDER BY Date"

objOutputChartFormat.groupSize = "800x600"
objOutputChartFormat.fileType = "GIF"
objOutputChartFormat.chartType = "Area"
objOutputChartFormat.categories = "ON"
objOutputChartFormat.values = "ON"
objOutputChartFormat.legend = "OFF"
objOutputChartFormat.config = "HitsByDay.js"

objLogQuery.ExecuteBatch strSQL, objInputW3CFormat, objOutputChartFormat
Simple Output
Taking a look at the resulting chart, you can see why I mentioned earlier that the configuration script wasn't very useful; all it does is add a centered title to the bottom of the chart:

Yup - that's a pretty useless sample configuration script for chart customization.
Next...
In my subsequent posts, I'll show how to make this chart (and several other types of charts) look a lot better.
Note: This blog was originally posted at http://blogs.msdn.com/robert_mcmurray/
How to determine if FTP clients are using FTPS
04 October 2011 • by Bob • FTP, LogParser
One of my colleagues here at Microsoft, Emmanuel Boersma, just reminded me of an email thread that we had several weeks ago, where a customer had asked him how they could tell if FTPS was being used on their FTP server. He had pointed out that when he looks at his FTP log files, the port number was always 21, so it wasn't as easy as looking at a website's log files and looking for port 80 for HTTP versus port 443 for HTTPS. I had sent him the following notes, and I thought that they might make a good blog. ;-)
As I mentioned earlier, we had discussed the control channel is typically over port 21 for both FTP and FTPS, so you can't rely on the port. But having said that, I mentioned that you will see certain verbs in your FTP logs that will let you know when FTPS is being used, and that’s a reliable way to check.
With that in mind, I suggested the following two methods that you can use to determine if FTPS is being used:
- If the port number is something other than 990, and you see the following verbs being used (and succeeding), then Explicit FTPS is being used:
- AUTH
- PBSZ
- PROT
- If the port is 990, then Implicit FTPS is being used. (This means the FTPS is always on.)
For example, see the highlighted data in following FTP log file excerpts:
Explicit FTPS over port 21:
#Fields: date time c-ip cs-username cs-host s-ip s-port cs-method cs-uri-stem sc-status sc-win32-status sc-substatus sc-bytes cs-bytes time-taken
2011-06-30 22:11:24 ::1 - - ::1 21 ControlChannelOpened - - 0 0 0 0 0
2011-06-30 22:11:24 ::1 - - ::1 21 AUTH TLS 234 0 0 31 10 16
2011-06-30 22:11:27 ::1 - - ::1 21 PBSZ 0 200 0 0 69 8 0
2011-06-30 22:11:27 ::1 - - ::1 21 PROT P 200 0 0 69 8 0
2011-06-30 22:11:36 ::1 - - ::1 21 USER robert 331 0 0 69 13 0
2011-06-30 22:11:42 ::1 robert - ::1 21 PASS *** 230 0 0 53 15 2808
Implicit FTPS over port 990:
#Fields: date time c-ip cs-username cs-host s-ip s-port cs-method cs-uri-stem sc-status sc-win32-status sc-substatus sc-bytes cs-bytes time-taken
2011-06-30 22:16:55 ::1 - - ::1 990 ControlChannelOpened - - 0 0 0 0 0
2011-06-30 22:16:58 ::1 - - ::1 990 USER robert 331 0 0 69 13 0
2011-06-30 22:16:58 ::1 robert - ::1 990 PASS *** 230 0 0 53 15 78
2011-06-30 22:16:58 ::1 robert - ::1 990 SYST - 500 5 51 1005 6 0
2011-06-30 22:16:58 ::1 robert - ::1 990 FEAT - 211 0 0 313 6 0
2011-06-30 22:16:58 ::1 robert - ::1 990 OPTS UTF8+ON 200 0 0 85 14 0
2011-06-30 22:16:58 ::1 robert - ::1 990 PBSZ 0 200 0 0 69 8 0
2011-06-30 22:16:58 ::1 robert - ::1 990 PROT P 200 0 0 69 8 0
FWIW – An explanation about Implicit FTPS and Explicit FTPS can be found in the following articles:
- http://blogs.msdn.com/b/robert_mcmurray/archive/2008/11/10/ftp-clients-part-2-explicit-ftps-versus-implicit-ftps.aspx
- http://www.iis.net/ConfigReference/system.applicationHost/sites/site/ftpServer/security/ssl
Note: This blog was originally posted at http://blogs.msdn.com/robert_mcmurray/
Converting W3C log files to NCSA format
07 November 2006 • by Bob • IIS, LogParser
Around a year ago I wrote a blog entry titled "Converting NCSA log files to W3C format", which showed how to use the MSWC.IISLog object to convert log files in the NCSA format back to W3C format. I wrote that blog entry to make up for the fact that the CONVLOG.EXE utility only converts log files to NCSA format, which some older log analysis software packages require. So what happens if you have a bunch of log files in W3C format and you don't have a copy of CONVLOG.EXE on your computer?
This blog entry is something of a reverse direction on my previous post, and shows you how to use the MSUtil.LogQuery object to convert W3C log files to NCSA format. The MSUtil.LogQuery object is shipped with LogParser, which you can download from one of the following URLs:
- Version 2.2 and 2.0: http://www.microsoft.com/download, search for "Log Parser"
- Version 2.1: http://www.microsoft.com/download, search for "IIS 6.0 Resource Kit Tools"
Once you've downloaded and installed the LogParser package, you will need to manually register the LogParser.dll file in order to use the MSUtil.LogQuery object. Having done so, you can use the Windows Script Host (WSH) code in this blog article to convert a folder filled with W3C log files to NCSA format.
To use this code, just copy the code into notepad, and save it with a ".vbs" file extension on your system. To run it, copy the script to a folder that contains your W3C log files, (named "ex*.log"), then double-click it.
Option Explicit
Dim objFSO
Dim objFolder
Dim objInputFile
Dim objOutputFile
Dim objLogQuery
Dim objLogRecordSet
Dim objLogRecord
Dim strInputPath
Dim strOutputPath
Dim strLogRecord
Dim strLogTemp

Set objFSO = WScript.CreateObject("Scripting.FileSystemObject")
Set objFolder = objFSO.GetFolder(".")

For Each objInputFile In objFolder.Files
 strInputPath = LCase(objInputFile.Name)
 If Left(strInputPath,2) = "ex" And Right(strInputPath,4) = ".log" Then
  strOutputPath = objFolder.Path & "\" & "nc" & Mid(strInputPath,3)
  strInputPath = objFolder.Path & "\" & strInputPath
  Set objLogQuery = CreateObject("MSUtil.LogQuery")
  Set objLogRecordSet = objLogQuery.Execute("SELECT * FROM " & strInputPath)
  Set objOutputFile = objFSO.CreateTextFile(strOutputPath)
  Do While Not objLogRecordSet.atEnd

   Set objLogRecord = objLogRecordSet.getRecord
   strLogRecord = FormatField(objLogRecord.getValue("c-ip"))
   strLogRecord = strLogRecord & " " & FormatField("")
   strLogRecord = strLogRecord & " " & FormatField(objLogRecord.getValue("cs-username"))
   strLogTemp = BuildDateTime(objLogRecord.getValue("date"),objLogRecord.getValue("time"))
   strLogRecord = strLogRecord & " " & FormatField(strLogTemp)
   strLogRecord = strLogRecord & " """ & FormatField(objLogRecord.getValue("cs-method"))
   strLogRecord = strLogRecord & " " & FormatField(objLogRecord.getValue("cs-uri-stem"))
   strLogTemp = FormatField(objLogRecord.getValue("cs-version"))
   If strLogTemp = "-" Then
    strLogRecord = strLogRecord & " HTTP/1.0"""
   Else
    strLogRecord = strLogRecord & " " & strLogTemp & """"
   End If
   strLogRecord = strLogRecord & " " & FormatField(objLogRecord.getValue("sc-status"))
   strLogRecord = strLogRecord & " " & FormatField(objLogRecord.getValue("sc-bytes"))
    objOutputFile.WriteLine strLogRecord
   objLogRecordSet.moveNext
  Loop

  Set objLogQuery = Nothing
  objOutputFile.Close

 End If
Next

Function FormatField(tmpField)
 On Error Resume Next
 FormatField = "-"
 If Len(tmpField) > 0 Then FormatField = Trim(tmpField)
End Function

Function BuildDateTime(tmpDate,tmpTime)
 On Error Resume Next
 BuildDateTime = "[" & _
  Right("0" & Day(tmpDate),2) & "/" & _
  Left(MonthName(Month(tmpDate)),3) & "/" & _
  Year(tmpDate) & ":" & _
  Right("0" & Hour(tmpTime),2) & ":" & _
  Right("0" & Minute(tmpTime),2) & ":" & _
  Right("0" & Second(tmpTime),2) & _
  " +0000]"
End Function
I hope this helps!